Wednesday, September 18, 2013

Colony 


Imagine walking down your average city street in America. Especially in an area hard hit by economic collapse. Storefronts lie vacant, the streets are barren, paint peels off weather worn walls, and signs which once advertised booming businesses rust and droop from caving in facades. Tired, the city sighs the sullen exhalation of years of neglect. On such streets, nature waits patiently, longing for the day of its verdant return. In broken sidewalks, sprouting up amidst the cracks, grass springs up in tufts of green spray. The roots of trees, with herculean effort, push up concrete slabs as if trying to free themselves of their shackles. Animals scurry at night, leery of headlights and the thunderous whir of spinning wheels on the tired pavement.
                Now imagine, for a moment at least, that this gray world, sprouted forth from its own refuse, an organic landscape vibrant with color, texture, and alive in flowing form.  In windows, storefronts, across buckling walls, bursting out of floors and ceilings – a coral like mass of alien like life forms transforming space into scenes of beauty and grace. This is my vision. This is COLONY.
                The first in a series of unique organic looking installs that transform under-utilized and abandoned space into flowing organic looking sculptural landscapes. Like an invasive species out competing its rivals, these colonies will spread. Anywhere there is ruin, a Colony may take seed. So, as you walk, numbed by worry or transfixed by the soft light of technical gadgetry, please remember to take notice of the life around you – for in some forgotten recess or a crack in a crumbling wall, you may just stumble upon a new world. A world filled with strange life forms -- a colony that no other eyes have seen before. Now go forth and explore.


The above is a picture of the finished install. 

My original idea for the Colony install was to create a flowing organic sculptural piece which covered all four walls of the room in which I was installing in. However, several problems proved too much to overcome. For one, the walls in this room were in bad shape with the plaster cracking in places and in one spot missing entirely. I was worried that the weight of the piece would not be supported by the plaster of the walls. I was also worried that since I was going to have to use hundreds of nails, that more plaster would crack and fall off the walls further endangering my install. Originally I had thought to glue most of the pieces onto the wall, but being that I wanted to get all of my pieces back, and that the glue would be close to impossible to pry off the wall, I decided against the wall install and went with the floor instead.
Before I decided however, to abandon the wall install, I began laying all of my pieces out on the floor. The following pictures show this series of events. 


The above three pictures constituted the totality of the amount of material I had at the beginning of the Colony install. The original layout was haphazardly created. I was trying to gauge how much space the material would take up and whether or not I was going to be able to cover all the walls in the time allotted to me.


The above picture represents how much material I had after a little more than a month of work.


After another month or so of work the above is how much material I had completed. Creating my work is a painstaking process which takes months of intricate work. 

With a few weeks to go before the deadline I decided to do away with the flowing design and instead switch to a circular design with an inner and outer circle which consisted of different materials. 


After nearly five months of work the Colony install was finally finished. The following pictures represent the piece from a multitude of vantage points. 


 The above two pictures capture the sweep of the circle's arc going separate directions.


The following pictures are of the inner circle. 


The Following two pictures are of the finished install.


Materials used: Cardboard tubes of various sizes, paint, dye, various salts, oatmeal, cotton swabs, various yarns and fabrics, plaster, styrofoam, cardboard, various sands, and plaster. This is not a comprehensive list of materials but does represent the most common types used. Spring to summer 2013. 


Tuesday, November 13, 2012

Site Specific Install "Termitaria"

Termitaria Install

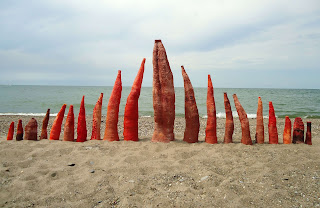
On a hot summer day my girlfriend and I decided to go to the Mentor Marina Park to set up a temporary site specific install. It was a hot day with high humidity and little breeze. Neither one of us were looking forward to the mile or so hike down the dirt trail to the beach which would have to be traversed with multiple pieces of art in hand. Luckily I had the "war cart" with me. The "war cart" is a large wagon with wooden sides, thick rubber wheels, and a sleek red steel body which is specifically made for yard work. I borrowed it from my parents for our excursion. 

With my art pieces loaded into the "war cart", lifting the whole load into my girlfriend's minivan proved to be a difficult task. Even with a makeshift ramp, pushing the cart into the back of the minivan was arduous. More difficult though, was getting the "war cart" down the steep slope at the end of the trail which empties out onto the beach. We had to transport each piece individually down the slope to the beach because I feared that if I were to take the "war car" down the treacherous slope, it would either careen out of control or jack knife spilling all its contents into the adjoining woods. In all, I must have made at least eight trips up and down as I safely transported piece after piece of what was about to become a site specific install. 

Though already sweaty, I excitedly got to work setting up my pieces. Normally there are relatively few people at this beach, but on this day, there were many boats anchored along the shoreline. Some people were swimming, some were suntanning, while others casually walked up and down the beach. As I was setting up my install, people would come by and ask me what I was doing. Upon learning that I was creating art, people were enthused and pleased to be witnessing something that is a bit out of the norm for a hot summer day at the beach. Generally, people seem to really enjoy art and watching artists create their works when it is in a setting that they can relate to. 

The highlight of the day though, came when two kids came up to my install and, as kids are prone to do, got real close and examined it as if it were some new discovery being viewed by fresh eyes for the very first time.  Kids are always the best viewers when it comes to art, for they have yet to be prejudiced by adult concerns of beauty, value, and taste. Kids enjoy and explore whereas adults always seem to want to know what it means or want to know what and why am I doing what I am doing. 

Anyway, here are some pictures of the days install. Enjoy.


The above three pictures are of my first install. My goal was to create a linear install that could be juxtaposed against the two differing backgrounds. The lake and the woods. 


The above two pictures are an example of tighter grouping. Hopefully, the more spire pieces I create the more elaborate the installs will become. 


The above two pictures are examples of a random type install. I was hoping to have more time to play around with this install and various other types of configurations. Unfortunately though, rain clouds started rolling in and we barely made it back to the minivan in time.


Two kids enthralled with my install.


The above photo was from a smaller test install I did earlier in the year in my mom's garden. Summer 2012. 


Tuesday, March 27, 2012

Temporary Install

The following pictures are from a work in progress.


A small selection of what will be a larger install placed in various parks around Northeast Ohio. This setup is just a trial run which was set up on my back porch in late Winter of 2012.


Angled top down view of some of the brighter orange pieces. 


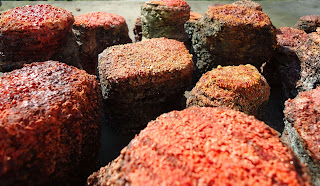
Two Close up views.


The top three pictures were taken at critter eye level.


Info: Temporary install on my back porch. This install showcases how these pieces look before putting the final coatings of sprays and matte medium on them. I tend to like them better at this stage than when finished, but without the sprays and matte medium I am afraid they will deteriorate. I am hoping to use hundreds if not thousands of these pieces in a larger install some day. 

They are made from layers of cardboard glued together, paint, various salts, dyes, plaster, and talus. Copyright 2012. 

Thursday, February 2, 2012

Nick Cave's Sound Suits at the Cincinnati Art Museum

The following pictures are a limited example of Nick Cave's sound suits as they were displayed at the Cincinnati art museum from January 12th 2012 to April 29th 2012.  


For more information concerning the art work of Nick Cave, please check out his webpage at the following: www.soundsuitshop.com

For more information concerning the Cincinnati Art Museum please check out their webpage at the following: www.cincinnatiartmuseum.org